
Today, I’m going to discuss miniature photography special effects. The effects below are ones done in front of the camera lens, not in post processing. I may do a follow up post with more effects and/or info on post processing options, so if you’d like to see anything in that regard, leave a comment with your ideas and questions below. Many of these effects can be used for other types of photography as well.
While I have used lots of fog and rain effects in my work, I am by no means an expert on any of these topics. If you have a better way of doing any of the below, let me know and I may add in your tips.
For any of these effects, especially the time sensitive ones – set up your camera and exposure before beginning working with the effect. You have to be quick with some of these to get the best capture.
Explosions
Canned Air
Use Canned air (spray duster) to blow dirt and sand up around you figure. Set your camera on multiple exposure and use a shutter remote if possible to take multiple photos of the effect one right after the other. This way you can choose which one turned out best after the fact.
Fireworks
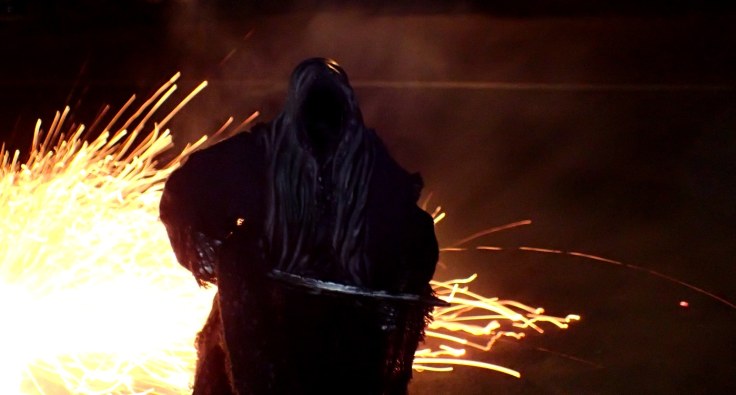
Sparklers
As with any real fire effects, damage to figures and toys is imminent. Keep a say distance from your camera and your most precious toys and be prepared with a bottle of water or towel in case you need to put out a small fire.
Once you’ve addressed safety concerns, simply light a sparkler or two and move them around the scene while you take multiple shots.
Smoke Bombs
There are different types of smoke bombs. I’ve found the colorful ball shaped ones don’t work well for this as they move too much and don’t emit much smoke. Instead try the cylindrical shaped ones. Note the safety concerns above. Figure out which way the wind is blowing and light the smoke bomb where the fuse is facing the wind direction, so that the sparks and smoke remain in the frame of your camera rather than floating outside of it. Many of these are made to spin when lit. Tack them down with clay or mud if you want them to stay in place.
Fire Crackers
These create the biggest/best explosion effects, but definitely put your props at risk. Make sure to anchor them well into the dirt/ground before lighting them so that the effect remains in your frame.
Fiber Optic Lights
For a fake background explosion effect, fiber optic lights pointed toward your camera lens work well.

Prop Explosions
These are pre-made for display, diorama and photographic purposes. Most often they are made of a semi-transparent plastic or foam insulation. Find them here and here.
You can also make a simplistic version on your own with cotton stuffing (learn more here). Or with hot glue (see below).

Fire
Cellophane
Cellophane is thin plastic sheeting that comes in a ton of different colors. Pair up red, orange and tons of yellow to create a fire-y look. This effect works best when you back light the cellophane so that it appears to be glowing.


Fake Tealight Candle
Battery operated tealight bulbs are simple to use, cheap to buy and the flickering mode makes for a great bonfire. Learn how to make your own bonfire with a fake tealight candle here. You can use the same effect to back light cellophane in a miniature fireplace.

Real Fire
Get a lighter or match and you’re well on your way. Go all for it and light a prop on fire and watch it burn, or start smaller by building a tiny bon fire with twigs or making a flammable backdrop. Just note your surroundings and be sure you’re not going to start something you can’t contain.

Fog
Textured Transparency Film
(or other semi transparent object, i.e. a dirty window – thanks for this idea aliceincleveland)
Easily bought on ebay, or certain office supply stores, transparency film with a fine texture (one that makes printing on easier) can be layered up to create a fog-like effect. This works best when the film is held midway between your lens and the scene your photographing and with a backlit subject. It’s the light hitting the film that drives the fog effect home. Make sure to focus your camera on the subject and to set your exposure (aperture and shutter speed) before placing the film in front of your lens.


Fog Machine
Pick up a fog machine from a local party supply store and you’re all set. It’s best to set the machine about 12 inches from your subject matter. Make sure you use the machine in a well ventilated area and away from a smoke detector. While the fog liquid is said to be completely safe, some people do complain of throat irritation after being exposed to it. For foggier images, contain the fog in your scene by surrounding the set on the back and sides by walls, cardboard, etc.


Atmosphere Aerosol
Fog in a can. This creates a very similar effect to that of a fog machine, but is used like canned air or spray paint. If you plan to shoot outdoors and want a fog effect, this is the way to go. Get some here.
Smoke Bomb
See the explosion section above for more details. If you’re wanting to use a smoke bomb for fog rather than explosion, simply wait until the initial sparks fizzle before photographing. The fog emits much longer from these than the sparks do.

Dry Ice
(update added 5/8 3:20 PM EST – thank you Mark Crummet)
A great way to create fog for an inexpensive ground cover effect is with dry ice. Learn more here.
Blood
Fake Halloween Blood or any other red water/syrup mixture
Drip it down into the scene, slather it on your figures/set or spew it into the scene using a splatter paint like method (i.e. get tons of it on a paint brush or tooth brush and use a sharp wrist motion to fling the ‘blood’ at the scene). The more watery the better when flinging fake blood – try mixing water with water based paint or food coloring.


Hot Glue + Paint
For effects that stay right where you place them or blood splatter suspended in thin air, make your own splatters with hot glue – learn how here.
Snow
Flour or Baking Soda
Use your hands, or better yet a strainer, to sift your white powdery kitchen products over your scene. Be sure to shoot multiple images so that you can select whichever image has the best effect. A slow shutter speed will show the snow falling in streaks. With a fast shutter speed you make just be able to capture some blobs of ‘snow’ frozen in the air.

Instant/Canned Snow
Canned snow, while pricey definitely makes for a good effect. Add water and you have an instant snow covering. However, this is not the best product for snow fall.
Rain
Spray/Mist
Use a spray bottle to mist your scene while you shoot. Experiment with different shutter speeds for rain streaks vs. still droplets.


Water Bottle with Holes in Cap
Poke holes with a needle in the cap of a disposable water bottle. Then tip the water bottle upside down and squeeze. This will create water streaks just where you want them.

Automatic Sink
You can create a similar effect to the above if you have access to an automatic sink, or if your faucet happens to have holes that segment the water fall. The aluminum or white ceramic shiny sink background also creates some cool bokeh effect in play with the water. Your camera most likely will get wet with this effect so bear that in mind.

Water
Clay or Silicone
Mold bodies of water with air dry clay or silicone caulk. Then paint with acrylic paint.


Resin
Mold more calm bodies of water with acrylic modeling water kits or resin. Just make sure you are using a water tight surface/container before you begin pouring in your mixture.
Real Water
Or simply use real water, as long as you’re okay with submerging your props. Use food coloring to tint the water and shoot through a glass container if your subject is completely submerged.


Have you tried any of the above? Do you plan to? Let me know in a comment below.
Lots of good stuff here! Thanks!
I’m a big fan of dry ice. Easy to work with, relatively nontoxic and gives a very nice ground fog effect, especially at slow shutter speeds.
Ooh that’s a great tip!
Very interesting post, Jennifer. The fibre optic effect intrigued me. Also, the fog effect, using textured transparency film. I plan to keep those in mind for future photos. Thanks for sharing! <3
Of course. So glad you’ve found some helpful info! I look forward to the photos you make with it.